PDF Available (better formatted)
Do you want to learn how to 3D model? I’d hope so or you might find the rest of this tutorial quite boring. Either way I welcome you to the world of 3D. I won’t sugar coat the fact that 3D is quite demanding. I hope to break 3D modeling down into smaller, digestible steps that make it seem a bit less scary. You won’t be going from the default cube to a fully rigged and functional character overnight, but we can’t reach that point if we don’t take the first step. So the end goal of this tutorial is try to show you that 3D isn’t as scary as it seems, by starting with the very basics.
Now I won’t require you to learn any advanced math, this tutorial is made to be followed along with so please bear with me while we lay the ground work. To start, my favorite kind of software is free and open source. It’s kinda self explanatory as to what software I’m talking about. It’s Blender. Blender is FOSS (Free and Open Source Software). Blender is capable of a lot, from hard surface modeling and sculpting, texture painting w/ shader editor, physics sims, animating, video-compositing… the list can keep on going. Now I hear you saying (thinking) “But a jack of all trades is a master of none.” To that I say fuck that, this shit is the real deal (and that’s not the whole quote dammit).
So lets jump right in, I promise you the first step is always the best. Blender can be downloaded from Blender.org with a click on the downloads page. It should default to your operating system. (Fair warning I am on Ubuntu, some of the file paths if mentioned or shown, will look different depending on your system. If you are struggling with the install, a short google search should help you, and god forbid it doesn’t I can offer help.)
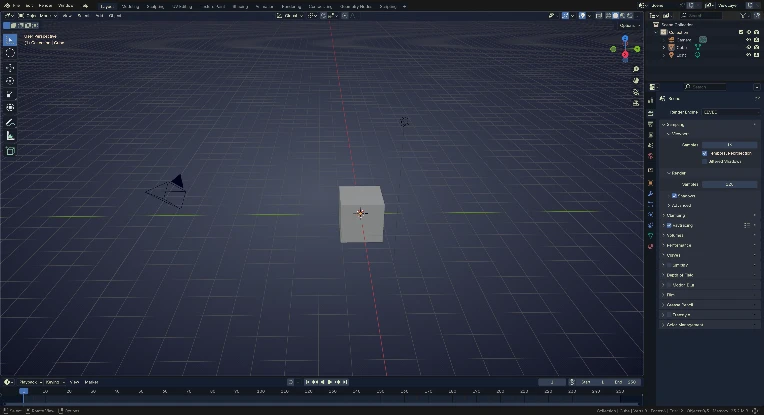 I mean, just look at this, this is peak performance. (Your blender is going to look different, I have a theme on cause default hurts my eyes. If you are interested in getting a theme, they are pretty easy to setup, they can be downloaded from inside blender. Top left tab, click on edit (A)>>> preferences (B) >>> get extensions (G), and change the drop down at the top of the window, next to the search bar (C), to themes (D) and go hog wild (F). You can change themes in the same preferences window under themes on the left (G), then the top drop down menu. My current theme is Blue Genes) ((yes I messed up the order, and yes I fucked up the image and didn’t want to change it. I do 3D not 2D please be patient with me))
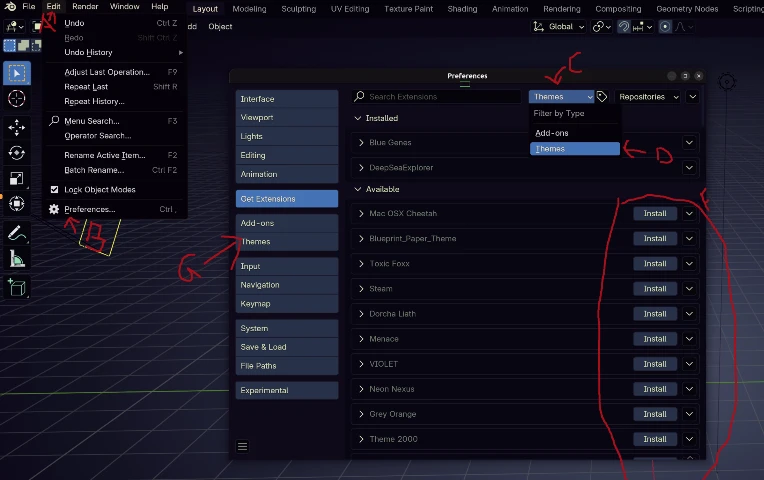
Short comings aside, lets close that menu for now and take a look at what we are working with.
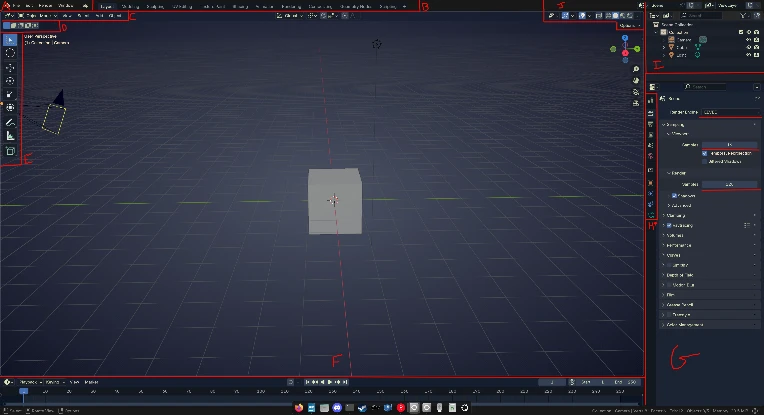
Sticking with the quick and dirty starting in the top left, we have your standard program stuff, files, edit + program settings, render menu, window editor, and help (A) If you need to look up something, the help tab has a link straight to the manual where you can search for anything about blender. I also encourage you to seek out the blender artists forms at some point as they have a lot of not just art, but bug and technical support, (and your search engine will either send you there or stack exchange at some point).
Moving over to the right slightly we have all the default workspaces (B) You can click on them to tab through and they all have differing layouts for helping with productivity. Don’t worry if you make changes to the layout or accidentally collapse a window, the next time you boot up a fresh file it will go back to its default, unless you manually save the changes of course (this will not be covered in today’s wall of text.) (C) IS A SUPER IMPORTANT GROUP. Until you learn the keybinds, this will be you life saver if you accidentally the everything. Starting from the left, the first drop down that looks like a grid, lets you change the window, don’t touch that please its very shy and shouldn’t be messed with at this moment. (It lets you customize the window to whatever view port you need, if you notice all the windows that blender consists of, there are also other icons denoting what type of window it is. (the time line at the bottom has a clock for example)) The next back up at (C) is what mode you are currently in. Depending on the type of object you have selected, determines what is in it.
I think It’s time to take our first step now. Yes now. I need to show off the fun menus.
Make sure you are in the Layout workspace at the top and then click into the window with the DEFAULT CUBE You can pan the camera around by clicking down your Middle Mouse Button/wheel. (If at any-point the key-binds don’t line up, its not you its me. Please DM me until I fix it k thanks (or you are using a pre 2010 mouse in that case you may want to get a newer one for now))
If you hold Shift while panning the camera around with Middle Mouse you can move the center of focus around.
Uh oh, did you get too far away from the cube or want to reset it? Period ON THE NUMPAD OF YOUR KEYBOARD will focus the camera on whatever you have selected. But Aulus, I don’t have a numerical keyboard, what do I do? You do what I just learned looking up the original keybinds, you hit Shift + C and it sets you back to default. You can also use the view menu in (C) and select Frame Selected to focus on an object. (If its greyed out you don’t have anything selected, use the previous shortcut) Hold up a sec, did you see that? Go back, they have the keybinds listed in the menus????? What a novel concept. Heres another freebie, if you don’t like the keybind, Right Click on it in the menu, you can change it or set a new keybind.
Next up we got the Select menu, when you are not working with geometry, this menu I find, is the least used. But once again as you learn the key binds, this drop down has all the shortcuts for selections. You can explore this one on your own, I trust that you can infer what some of these do and read their respective key binds (Hovering over almost anything in blender, will reveal a tooltip or hint to what something does).
Following select, we have the Add menu, the most exciting one. That cube is looking a little lonely right? Poor default cube is always the butt of jokes or tossed aside because they get in the way. But today, default cube gets a friend. If you click on the add menu, it will drop down a list of every type of object blender has a default for.
Mesh
Our friendly default cube comes from here. These base models, refereed to as primitives, are all basic shapes. Plane is a flat Face, Cube is cube, Circle is a bunch of vertices in a circle w/ no face, UV Sphere is for lack of a better term, a ball, and so is Icosphere, but the Icosphere is pointy. The rest kinda explain themselves. We won’t be covering more than geometry today, I will briefly explain the rest as followed.
Curve
Mathematical curves that can be used for a whole bunch of cool effects or create intricate patterns. You can repeat geometry over a defined path for an example.
Surface
Gonna be honest, never used them, don’t know what they are really used for.
Metaball
These are fun, but can become really demanding of your pc if you use a lot of them. They basically are geometry that will merge/morph together to form a amorphous mesh that can change on the fly depending on their density settings, I can only assume you know what I use them for and we will leave them at that (Gotta keep it below A rating).
Text
Self explanatory, basically a mesh that is generated from a font you select. You can control a lot with these but geometry nodes can do so much more than the basic text options.
Volume
These are the volumetrics you hear so much about in bido gaem 2. These are very demanding of your GPU and can easily explode the render times on your scenes. But gawd damn do they look purdy.
Grease Pencil
Voodoo magic. I’m only slightly joking, Grease Pencil allows you to work and animate with 2D within blender (Sorry I don’t think you can convert images to GP, its basically vector drawing). I’ve only played a bit with it but there are some really crazy effects you can do with drawing on a 3D object with GP.
Armature
The Animators Swiss army knife. Armatures are how you make characters in 3D, well, animate. Armatures can be used to create either a simple arm, to an entire steam engine. They are one of the most important parts of 3D animation and if you plan on making characters or things move in complex ways, you are going to have to learn to rig. But today’s your lucky day, you don’t have to go down this rabbit hole yet, I do want you to stick around.
Lattice
Another way to animate objects, usually deformations. You can use physics on these as well as change the precision. Not my favorite way to do physics but can really bring down the computation needed for some basic physics sims.
Empty
Like my brain, these are usually used to mark spots, the Hook modifier, or provide a convenient parent to a large set of models (Easier to move a couch with multiple cushions parented to a big box that only exists inside the editor)
Image
Implied by the name, import an image into the scene. I use this to bring reference images for sculpting. They import flat to the view you currently have. Can also be imported as a background
Light
Lights for renders. 3 point light is an enigma to me, the others explain themselves.
Light Probe
Mainly useful in the EEVEE render, this allows you to get reflective effects + more accurate ray-casts from lights to the camera. Definitely not always needed as they increase render times.
Camera
Where and how blender renders the scene. The settings have a lot of overlap with real cameras (I don’t know much but its fun to play with the values.)
Speaker
For localized sound in animations. (Also used in the blender game engine that used to be a thing)
Force Fields
Used for affecting physics sims and particle systems. Won’t effect stuff unless you set it up. Sorry no tornado of cubes today.
Collection Instance
Collections are used to organize your scene, the inspector at (I) lets you move objects in and out of collections. The instance basically lets you copy a collection and duplicate it.
Now you may already be getting a little flustered, if you are that totally okay, take a sec to stretch or get a drink, Blender ain’t going no where.
If you’re feeling better we will pick up the pace a bit. The final menu in (C) Is the Object menu, its basically the rest of the functions you can do to an object. We won’t be using it very much as going into the menu each time to move something is ass, trust me.
To speed some of this up, the next (D) is selection type, nothing much here, similar to photoshop/krita area select modes. (1 at a time, add, add/sub, invert, intersect) Please remain on the first one, or you will start selecting things weirdly and if you do I’ll be like “But you didn’t listen.” and probably be a little disappointed.
(E) is your currently available tools.
You can click on any of the icons to switch to them.
Selection Tool (W)
This is the tool you use to select objects. W will change what kind of selection mode you are in. Box, Lasso, Hover, Single, are your choices. Holding Shift while you Left Click on objects lets you select/deselect more than one at a time. Holding Ctrl will let you click through overlapping objects one at a time.
Cursor (Shift + Right Mouse Button)
The cursor is the little red circle with the black lines poking out of it. Any new objects spawns on the cursor and you can anchor all movements to it, another down the line function. At the moment, you can Right Cick while holding Shift to place it anywhere in the scene view port your mouse is hovering over. Or selecting the tool on the bar lets you move it with a Left click.
Shift + S will bring up a selection wheel that lets you change the position of the Cursor based on your selection, or just rest it back to the world origin.
Move/Translate (G)
Self explanatory, lets you move stuff around the scene. If you hit G while having the cube selected you can move it around with the mouse, Left Click or Enter will apply the movement and Right Click will revert the change. (Anything selected has an orange outline, or center. Unless your theme changes that.) If while moving you hit X, Y, or Z, you can restrict the movement to that axis ( Holding Shift while pressing an axis key, will invert it and restrict moment against that axis ie: Shift X will only allow you to move the object along the Y and Z axis). If you can’t see the axis markers, yes you can. Click on the move tool in the tool bar and suddenly there are arrows pointing out of your object. Each color represents a different axis, in the top left, near (I) there is a neat little diagram that shows you what color is each. If you are colorblind there are accessibility themes, but to give you written reference, X and Y are lateral/horizontal, while Z is UP/Down. You can change which way the move tool responds to movement ie: does it move relative to the world, itself, the cursor, or the camera. The XYZ trick can be also applied to Rotate and Scale to rotate/scale along those axis.
Rotate (R)
Self explanatory, lets you rotate. If you click on the tool instead of the keybind you can rotate along the specific axis easily with just your mouse. A thing I forgot to mention is while you are moving/rotating/scaling, you can hold Shift at any point to make really fine adjustments, and Ctrl to make move in increments (Usually based on the size of the grid that is visible.)
Scale (S)
Self explanatory, make object big or small. Another neat trick is that you can move/rotate/scale by precise numbers. Entering any number, numpad or the ones at the top of your keyboard, you can enter in whatever number. It also doesn’t have to be just numbers, it can be full on mathematical expressions. Lets say you enter 3 * 3, it will do the math and apply the number to whatever of these 3 functions you are using. It works with the axis filtering too. Number input also works with almost any tool.
If you haven’t been testing out the tools on the poor defenseless cube sitting in the view port, whats keeping you? That cube has been bad mouthing you behind your back, are you really gonna let them remain square like that? Give them a friend? I didn’t say anything like that, go turn them into a rectangle.
Transform
All the little gizmos from the 3 previous tools in one. Not really my favorite as its easy to miss click and choose the wrong tool.
Annotate
Lets you draw out your ideas with a vector pen. It does draw in 3D space so it takes a bit to get used too. You can also animate these for story boarding by changing the frame you are currently on and drawing. There is a menu that appears at the top to control its visibility to you. Annotations are never rendered unless you render the view port itself.
Ruler
Yes you can measure distance in blender. It is currently most likely set on 1 unit in the engine is 1 meter in real life, but my 3D printer and slicer would like a word with blender.
Add Cube
Neat tool I didn’t know existed, lets you make a cube by basically picking its shape, give it a try, its hard to explain.
Now I hear you saying, “Aulus, these tools are all well and good, but I want to make complex things.” I’d hope at this point you’ve been toying around with the tools. If the place is cluttered with random objects, then you and me are gonna get along swell. Del or X are how you remove objects. X (the key not the nazi bar) is polite and will ask you if you’re sure you want to remove something. Del will send it to the abyss with no prompt, so be sure which one you want to use. I also forgot the most important keys tho, Ctrl+Z and Ctrl+Y are undo and redo respectively.
So now that the basics are out of the way, I think its best to do something more sinister to our cube. Sinister being only a sentence enhancer, what I mean is, make the cube, not cube.
(If you need to know what shape to achieve in the next section, scroll down a bit)
Todo that, if you didn’t turn ol’ default cube into a rectangle, now would be the time, preferably along the Y axis [S + Y, then drag] (Don’t forget to left click or hit enter to commit the change)
(Also due to NG’s blog image limit, I may have to cut this up, but who knows. There will be a PDF available as one solid document to make it easier to follow. Also don’t worry about it looking exactly as my example, perfection is a mind killer)
Sadly, our cube still doesn’t seem right, give it a bit more pudge on the X axis and set the Z axis to 2. [S + X, and drag] then [S + Z, and hit 2 on your keyboard]
Hopefully, you didn’t end up with just a bigger square, we are looking for something a bit more shipping boxy.
Here comes the fun part, directly editing the mesh. There are three ways to enter EDIT MODE:
- The drop down menu in (C) and select EDIT MODE
- TAB on the keyboard takes you straight into EDIT MODE when selecting most modifiable objects (Will also enter edit mode on all selected objects, denoted by a darker orange outline).
- CTRL + TAB should bring up a selection wheel that allows you to easily change between all the different edit modes, hover over EDIT MODE and let go of the keys.
You should now be in edit mode, things will look very different. Your arsenal of tools should have expanded. Please take a moment to read their names + tool tips. (The large number of squares that have taken over (E)) You may also see that all vertices are selected, and our not square box is looking a little orange.
I’ll briefly explain what you are now seeing. Anything currently selected in blender will be orange. At this moment, you are in vertex mode, so selecting the vertices causes them to highlight any connection between them. This is approaching gibberish territory so we unfortunately need to go over some vocab (Yes I lied, the fun part is delayed yet again).
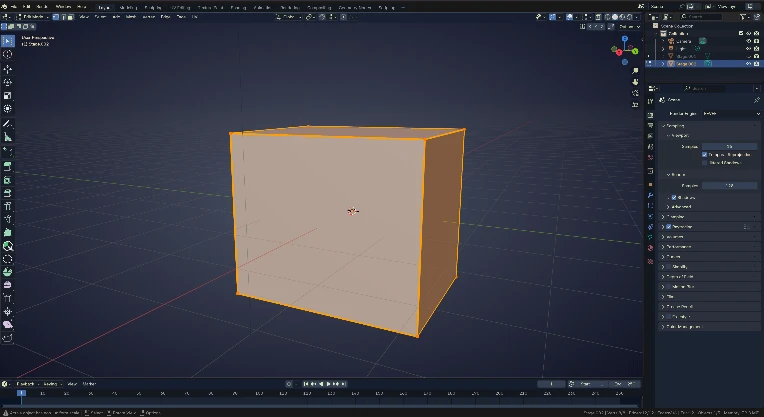
- Vertex or Vertices are nothing but points in 3D space, in the case of Blender (X, Y, Z). Any and every mesh is comprised of a multitude of vertices. Working with vertexes directly is not the usual starting point for most 3D objects, but you can build anything vertex by vertex, if you are up for a challenge.
- Edges are a connection between 2 vertexes.
- Faces are a connection between 3 or more Edges (Seeing the pattern here?)
So with faces there are a few rules that you should adhere too as you begin your 3D journey.
- Thou shall use Tri’s or Quad’s
A Tri is a face made up of 3 edges, and 3 vertices. Just a triangle.
A Quad is a face made up of 4 edges, and 4 vertices. A polygon.
These two are the biggest ones you really need to keep in the back of your mind, as anything past a Quad is considered a N-Gon (A polygon with N number of edges) These are no issue if you do end up creating a few, but for game dev + shading N-Gons can cause a wide range of issues, so don’t freak out if you end up creating one.
- Thou shall hit UNDO [CTRL + Z] and REDO [CTRL + U]
If you think you made a mistake, Undo is your best friend. You can always redo until you commit to another change to the model, then all redo’s are cleared until you undo again.
A new set of SELECT MODE(s) should have popped up in area (C), [1] is vertex mode, [2] is edge mode, [3] is face mode. For the sake of the tutorial please enter EDGE MODE by hitting [2] on your keyboard.
The vertices should have disappeared and only the edges + faces remain highlighted.
Next, we are going to double tap [A] to deselect everything.
Nothing should be selected. This would be the part where I teach you how to extrude things, one the very first things you should learn. Extruding now isn’t the play.
So I want you to hit [CTRL + R], this is the Edge Loop tool.
This will allow you to segment things across the edges of your mesh. We are going to add to the middle of the mesh, a few loops going from top to bottom.
- While hovering over Edges with the Edge Loop Tool you will see a new set of edges being projected onto the mesh.
- From here, you can Scroll your mouse wheel up or down to increase/decrease the number of cuts, or enter a number on your keyboard. We are going to go with 4 cuts at this moment, vertically (see the next image for a hint).
- Once you have selected the correct edge, Left Click to apply the cut, be careful though, after picking which edge to cut, you can now shift the positioning of the edges to be off center. Left Click or Enter to apply the cut or Right Click to cancel if you don’t like the position.
After that, activate the Edge Loop Tool again and place another 2 cuts across the center, going the other direction. You should end up with something like this:
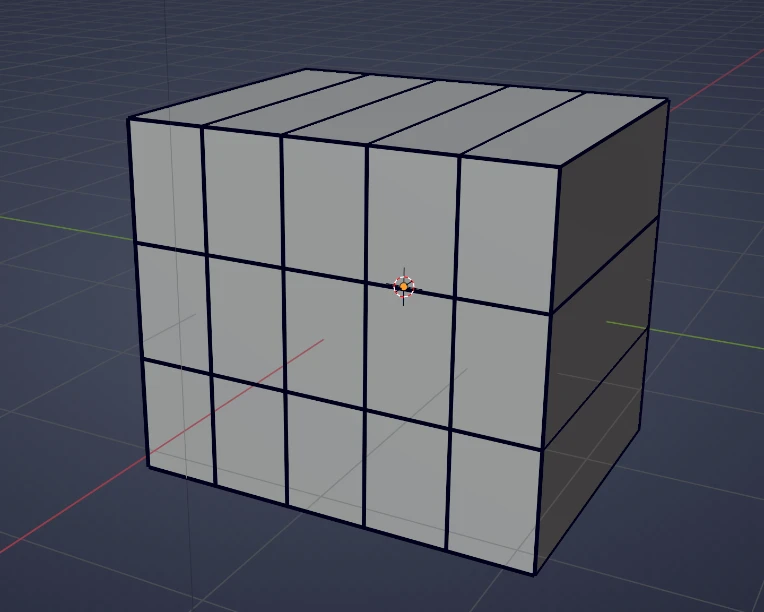
Now we have a bit of a canvas to get a rough shape of a hopefully familiar character. Extruding the goggles is next. Make sure you have the Select Tool (W) selected, and make sure you are on Face Select Mode (3) and make this kind of selection (Shift Left click to select multiple faces, or change to another Select Tool by hitting W)
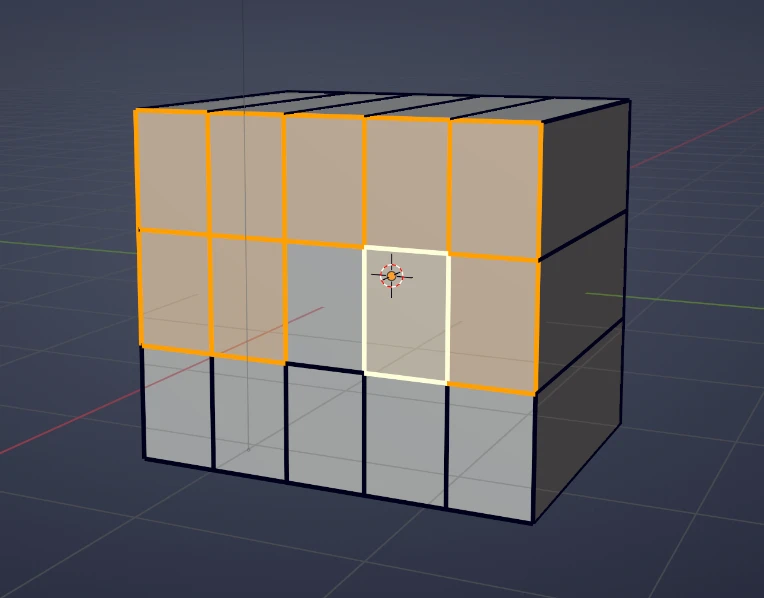
Once you have a similar selection, its time to add depth. Start Extruding the faces by hitting (E). Once you start extruding, you can drag your mouse to change the depth of the extrusion. Like every other tool, (Shift) will allow you have a bit more precision when dragging, and (Ctrl) will snap to the grid increments. We don’t need to worry about that at the moment (but if you want to play with them go nuts), but continuing with an explanation of the tool, just like the Move Tool you can hit X, Y, Z to lock your extrusion to an axis, but it should already be extruding along the Normal of your selection.
Normals: are basically the direction a vertex/edge/face is well, facing, and defines the front and back of a face. (There is more to it but you don’t need to know it all right now)
You can also see all the extra options down at the bottom of the viewport, with their corresponding key-binds to use them. But since I’m running out of time to make this tutorial, I am going to ask that you extrude the goggles out to about this far:
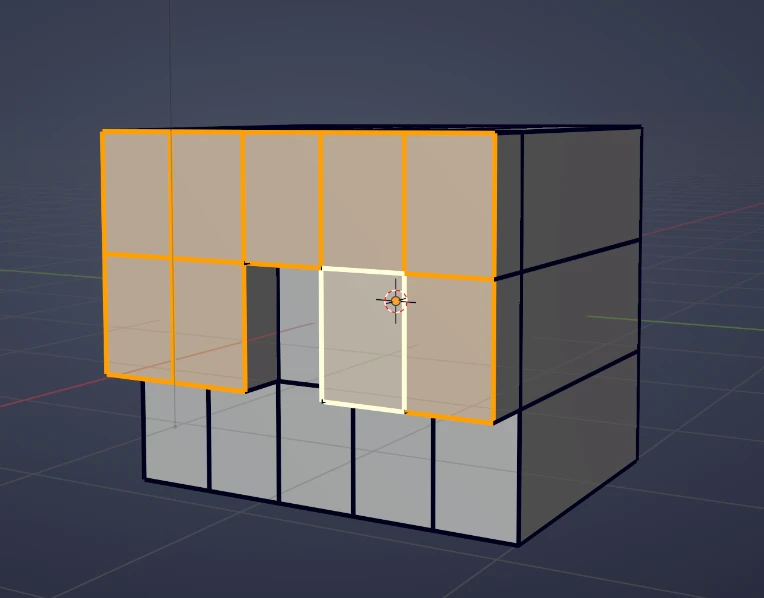
After you feel the goggles are of sufficient thickness, Left Click to lock in the changes, but if you think you would like to redo it or don’t like it you can Right Click or ESC to cancel and try again. If you accidentally locked in the change, remember to Undo (Ctrl + Z).
The next thing would be to give them a bit more of a brain bucket, so we are going to rotate the camera (MMB) to see the top of the cube and select the top faces, ignoring the top faces of the goggles. Extrude the faces a bit, as shown below. You should be able to see a bit of resemblance here now.
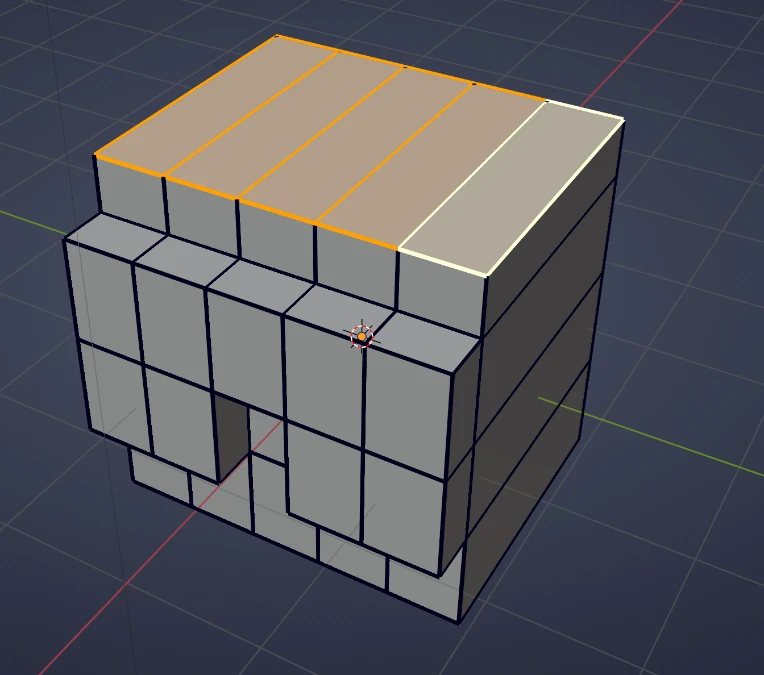
So we could call it here, but why half ass it?. I would continue to go step by step on each tweak or extrusion I could make to create the Tankman, but I would be here another few hours breaking this down to fit into the blog limit. So instead I’ll issue a challenge to you. I want you to add the ear protectors on your own, and add a bit of a part to the goggle in the middle. I’ll give you some more tips to hopefully ease the process.
This is your final shape
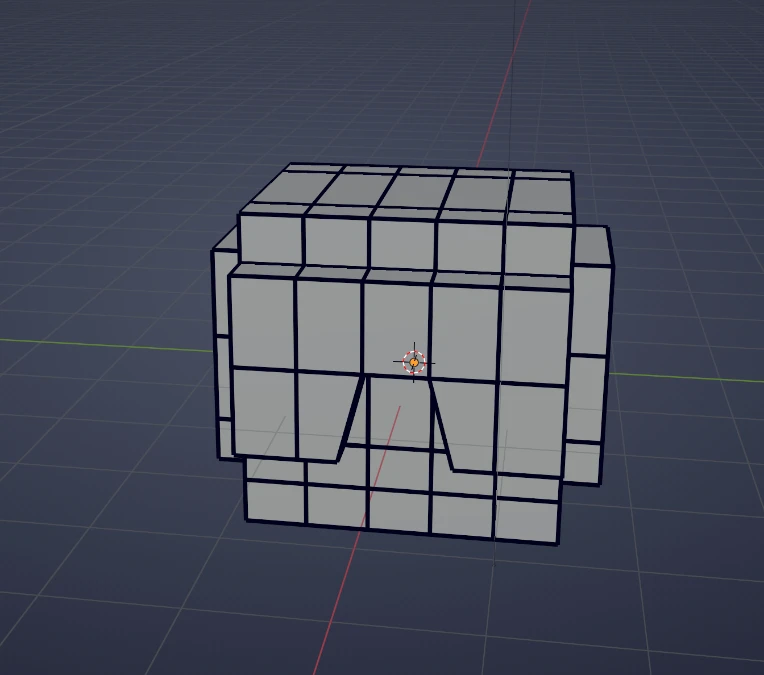
(There is a bit of an issue with the geometry by the bridge of the goggles but just go with it, nothing is ever perfect, we all make mistakes)
Hot Tips, fresh off the bbq:
- With the Select Tool if you select a single face/edge/vertex, holding CRTL and selecting another face/edge/vertex will select everything between those two, as the shortest path. A great way to select a couple things in a row.
- Speaking of connecting things in a row. If you hold ALT when selecting things in face/edge select, you will select everything connected along that edge/face. For face select, you have to click on the edge you want the selection to propagate along.
- Scaling can be used to move things proportionally, I.E. if you create 2 edge loops and don’t like that its evenly spaced, you can change to Edge Mode, select both edge loops with the ALT (hold Shift to select more) trick. Once you have your edges selected, you can Scale (S) and chose the axis (X, Y, Z) you would like to move it along, it will maintain the other 2 axis. This also works in Vertex and Face Mode
- Extruding has a bunch of extra modes to make life a bit easier. If you are struggling to keep the ear-pros equal in depth, you can select both side of the head, and hit ALT + E and you will see a bunch of new options, the one you are looking for is Extrude Faces Along Normal. It will extrude everything based on the way the faces are pointing, allowing you to evenly exude things on the opposite side of the mesh.
- There are ways to edit things with a mirror mode enabled. The easiest is up by (J) a another set of buttons labeled X,Y,Z, enables mirror mode along those axis. It is based on the object’s base rotation, in my case Y correctly mirrored my movements on the head. Unfortunately, this only mirrors movements/adjustments to the mesh, it will not mirror extrusions or modifying changes.
- There is a modifier that will mirror the geometry based on a a selected axis, that will mirror everything you do to the mesh. You also only need to work on 1 half of the mesh and the rest is taken care of by the modifier. All modifiers in Blender are Non-Destructive, meaning they will not alter the mesh or change data on the mesh permanently. You can always remove them to undo the effect. However, in the case of the Mirror Modifier, when working with characters/models that will be rigged, you have to apply the modifier to have full control over the mesh without any fucky-wucky stuff. Unless you want to cut the head in half, its best not to worry about this one.
So now that you have hopefully something resembling Tankman’s head, you can exit Edit Mode with TAB. Part 2 continues onto the last part if you aren't satisfied with a blocky finish.